
Knowing how to clean water softener equipment properly helps protect water flow, reduce salt waste, and keep the system regenerating as intended. Most routine cleaning focuses on the brine tank, but the resin bed, injector, and drain connection may also need attention when performance changes.
A water softener does not need to be taken apart on a fixed schedule. The right maintenance depends on your water hardness, iron or manganese levels, salt type, household water use, and the manufacturer’s instructions. Cleaning too aggressively—or using the wrong chemical—can damage components or create a sanitation problem.
This step-by-step guide explains how to clean a water softener safely, what each cleaning task accomplishes, and when a problem is better handled by a qualified water-treatment professional.
What Parts of a Water Softener Need Cleaning?
A conventional ion-exchange water softener has several parts that may need periodic maintenance. They do not all require cleaning at the same time.
| Component | What Can Build Up | Common Signs It Needs Attention |
|---|---|---|
| Brine tank | Salt residue, salt mush, sediment, or debris | Salt does not appear to drop, poor regeneration, visible buildup |
| Resin bed | Iron, manganese, sediment, or organic fouling | Hard water returns sooner, staining, declining softening performance |
| Injector or venturi | Mineral scale or fine sediment | Unit does not draw brine properly during regeneration |
| Brine well and float assembly | Salt residue or debris that affects movement | Improper water level in brine tank or irregular regeneration |
| Exterior and surrounding area | Dust, moisture, leaks, and salt spills | Corrosion, pests, slip hazards, or unnoticed leaks |
Not every hard-water symptom means the softener is dirty. A softener may also perform poorly because of incorrect settings, exhausted resin, a failed control valve, a blocked drain line, a plumbing bypass, or water conditions beyond the unit’s design limits. Testing the water before and after the softener can help identify whether hardness removal is actually declining.
Before You Start: Safety and Preparation
Before cleaning a water softener, read the manual for your exact model. Valve layouts, cleaning instructions, regeneration controls, and approved products vary by manufacturer.
For routine maintenance, keep the work limited to accessible, manufacturer-approved parts. Do not open the control valve, alter electrical wiring, disassemble pressurized plumbing, or force stuck components. If the unit is leaking, the drain line is overflowing, or the system has an electrical problem, contact a qualified water-treatment technician or plumber.
Gather the Supplies You May Need
- Clean bucket or container for salt removal
- Plastic scoop
- Soft cloth or sponge
- Mild dish soap, if approved for cleaning the empty brine tank
- Clean water for rinsing
- Water softener resin cleaner approved for your system, if needed
- Replacement salt suitable for your softener
- Owner’s manual and any manufacturer-specific cleaning instructions
Do not mix cleaning products. In particular, avoid combining bleach, acids, resin cleaners, or other chemicals unless the manufacturer explicitly directs you to do so. Chemical reactions can create dangerous fumes or damage the softener’s resin, seals, and metal parts.
How to Clean Water Softener Brine Tank
The brine tank is the separate tank that holds salt and water. During regeneration, the softener uses brine to recharge the resin beads that remove hardness minerals. Cleaning the brine tank is useful when you see sludge, salt crust, dirt, or a persistent salt bridge.
Many households clean the brine tank when it is nearly empty rather than on a strict calendar. If your water contains high levels of iron or sediment, it may need attention more often.
Step 1: Let the Salt Level Run Low
Wait until the salt level is low enough to make cleanup manageable. Avoid deliberately letting a softener run completely out of salt if it is currently supplying softened water; the resin may become depleted, and hard water can reach the home until regeneration is restored.
If the tank contains a large amount of compacted salt, remove it gradually with a plastic scoop. Do not strike the tank with sharp tools or use a metal object to chip hardened salt from the walls.
Step 2: Put the Softener in Bypass if Necessary
If the manufacturer instructs you to bypass the softener before servicing, use the built-in bypass valve according to the manual. In bypass mode, the home usually receives untreated water while the softener is isolated.
Bypassing the unit may be helpful during a longer cleaning task, but do not assume every system should be bypassed for every maintenance step. Follow the valve manufacturer’s instructions, especially if your system shares plumbing with other treatment equipment.
Step 3: Remove Remaining Salt and Loose Debris
Scoop out loose salt, salt pellets, and visible debris. If there is a salt bridge—a hard crust that creates an empty space below the salt—break it gently with a blunt plastic handle or another tool that will not puncture the tank. Stop if you meet strong resistance or cannot tell where the brine well, tubing, or tank wall is located.
A salt bridge can make the tank look full even though the salt below it is no longer dissolving. The softener may then regenerate with little or no brine, causing hard water to return.
Step 4: Empty the Brine Water as Directed
Some models allow the brine tank to be emptied as part of a manual regeneration cycle, while others require a different method. Follow the manual rather than disconnecting hoses or tipping a full tank.
Brine is highly salty. Do not discharge it onto lawns, gardens, septic components, or areas where it may harm plants, corrode surfaces, or violate local disposal rules. If you are unsure how to empty the tank safely, ask a water-treatment professional.
Step 5: Wash and Rinse the Empty Tank
Once the tank is empty and safe to access, wipe the inside with a soft cloth or sponge. If your manufacturer permits it, use a small amount of mild dish soap to loosen residue. Clean around the bottom of the tank, the brine well, and the area surrounding the float assembly without pulling on tubing or moving parts.
Rinse thoroughly with clean water. Soap residue can interfere with normal operation, so do not leave suds behind. Avoid abrasive pads, strong solvents, and unapproved cleaners.
Step 6: Refill With the Right Salt
After the tank is clean and rinsed, add water softener salt recommended by the manufacturer. High-purity evaporated salt pellets often leave less insoluble residue than lower-purity rock salt, although the best choice depends on the unit and local water conditions.
Do not overfill the tank. Keeping salt at a moderate level makes it easier to spot bridging and prevents the oldest salt from sitting unused for long periods. Keep the lid closed to limit dirt and moisture.
Step 7: Return the System to Service
If you used bypass mode, return the softener to service according to the manual. The unit may need a manual regeneration before it can provide fully softened water again. Confirm that the brine tank refills and drains normally during the next regeneration cycle.
How to Clean the Resin Bed
The resin bed is inside the mineral tank, not the brine tank. Resin beads exchange sodium or potassium ions for hardness minerals such as calcium and magnesium. In some well-water systems, iron, manganese, sediment, or organic material can coat the resin and reduce its ability to soften water.
You generally do not remove resin from the tank for routine cleaning. Instead, use a resin cleaner specifically labeled for household water softeners and compatible with your unit.

Credit: ultra-soft.co.uk
Choose a Cleaner That Matches the Problem
Resin cleaner is not a universal product. Some products are formulated primarily for iron fouling, while others address certain mineral deposits or organic buildup. The right choice depends on your water test results and the cause of the softener’s declining performance.
If you have recurring orange, brown, or black staining, test for iron and manganese rather than assuming the softener alone can manage the issue. A standard softener may handle limited amounts of dissolved iron under suitable conditions, but significant iron, manganese, sediment, sulfur odors, or iron bacteria often require pretreatment.
Add Resin Cleaner Only as Directed
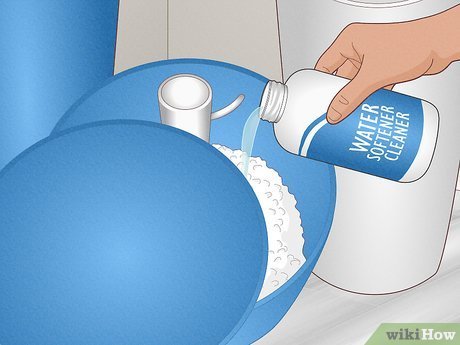
Follow the cleaner label and your softener manual for the approved amount and where to add it. Many systems use the brine well or brine tank, but the correct method is model-specific. Do not pour a cleaner into the resin tank or control valve unless the manufacturer clearly instructs you to do so.
After adding the cleaner, start a regeneration cycle if the product instructions call for one. The regeneration process draws cleaning solution through the resin and then rinses the bed before the softener returns to normal service.
Check Whether Cleaning Solved the Issue
After regeneration, allow the unit to complete all stages. Then check for practical improvements, such as better soap lather, less spotting, or a return to the normal interval between regenerations. For a more reliable answer, compare hardness in untreated water and softened water using an appropriate test or certified laboratory analysis.
If softened water remains hard after cleaning and proper regeneration, the problem may involve the control valve, settings, resin condition, plumbing bypass, or another treatment issue. Repeatedly adding cleaner without identifying the cause may not help.
Cleaning the Injector, Venturi, and Brine Components
The injector, sometimes called a venturi, creates suction that draws brine from the brine tank during regeneration. Mineral scale or sediment can restrict this small passage and prevent proper brine draw.
Because injector designs differ, this task should be done only with the exact manufacturer instructions. Some units have an accessible injector screen and cap; others require more involved service.

Credit: justplumbingaz.com
Signs of an Injector or Brine-Draw Problem
- The brine tank water level stays unusually high after regeneration.
- Salt remains in the tank but the system is delivering hard water.
- The unit appears to regenerate, but the brine level does not change as expected.
- The control valve displays an error or the cycle stops unexpectedly.
These signs are not proof that the injector is clogged. A kinked brine line, blocked drain line, malfunctioning float, valve issue, or incorrect programming can cause similar symptoms.
Clean Only Accessible Parts
With the softener in the service position specified by the manufacturer and power isolated if the manual requires it, remove and clean only the accessible injector components described in the manual. Rinse screens and small parts with clean water. Do not enlarge openings with pins, drills, wire, or sharp tools, as even minor damage can change water flow.
Reassemble parts in the correct order, checking that seals are clean and properly seated. If a gasket is cracked, stretched, or missing, use the correct replacement part rather than attempting to seal it with tape or adhesive.
How to Prevent Salt Bridges and Salt Mush
Salt bridges and salt mush are common reasons homeowners search for how do you clean a water softener. They are related but different problems.
- Salt bridge: A hard crust forms above the water line, leaving a hollow space underneath. The tank looks full, but salt is not reaching the water.
- Salt mush: Dissolved salt recrystallizes into a thick layer at the bottom of the tank. It can interfere with brine formation and block normal operation.
Humidity, infrequent regeneration, poor-quality salt, overfilling, and certain water conditions can contribute to buildup. To reduce the risk, keep the lid closed, avoid filling the tank to the top, use a compatible high-quality salt, and check the tank periodically instead of adding salt only when it looks full.
If bridges or mush return frequently, review the softener’s regeneration settings and water use. A unit that regenerates too rarely may leave salt sitting for long periods, while an improperly configured system may not use water and salt efficiently. A qualified professional can evaluate the settings against measured hardness, household demand, and the unit’s usable capacity.
When to Clean, Service, or Test Your Water
Routine attention can prevent many softener problems, but cleaning has limits. A well water system should be based on tested water conditions, especially when staining, odor, cloudiness, corrosion, or sudden changes appear.
Clean the System When You Notice These Conditions
- Visible dirt, salt sludge, or hardened buildup in the brine tank
- A salt bridge or salt mush
- Reduced soft-water performance after confirming the unit has salt and has regenerated
- Signs that the injector or brine components may be restricted
- Salt spills, moisture, or debris around the unit
Arrange Professional Service When These Problems Occur
- Water leaks from the valve head, tank, fittings, or drain connection
- The brine tank overflows or repeatedly holds too much water
- The unit will not regenerate or displays a persistent error
- There is no improvement after approved cleaning and correct regeneration
- The mineral tank is damaged, bulging, cracked, or showing signs of pressure-related failure
Test Water When Water Quality Changes
A water softener removes hardness minerals through ion exchange; it is not a complete water purification system. It does not disinfect water or reliably address every well-water contaminant. If your well water develops a new odor, color, taste, sediment problem, or staining pattern, consider laboratory testing that matches the symptom and local well-water risks.
For example, hardness, pH, iron, manganese, and total dissolved solids may help explain softener performance. Microbial testing, nitrate testing, arsenic testing, and other health-related analyses should be selected based on local guidance, well history, and potential contamination sources. A home test strip can be useful for basic screening, but it does not replace a properly collected certified laboratory test.
Frequently Asked Questions

Credit: softprowatersystems.com
How often should a water softener brine tank be cleaned?
There is no single schedule that fits every home. Clean the brine tank when you see salt mush, debris, persistent residue, or bridging, and follow the maintenance interval in your model’s manual. Homes with iron-rich water or lower-purity salt may need more frequent cleaning than homes with relatively clean water.
Can I use vinegar to clean a water softener?
Do not assume vinegar is safe for every part of a softener. It may be appropriate for certain manufacturer-approved cleaning tasks, but it can be unsuitable for other components or water-treatment systems. Use only the cleaning method and product approved for your specific model.
Why is my water softener full of water but still has salt?
A high water level may point to a brine-draw problem, such as a restricted injector, blocked drain line, kinked brine tubing, float issue, or control-valve malfunction. Because several faults can create the same symptom, check the manual and arrange service if the condition continues.
Will cleaning a water softener remove iron stains from fixtures?
Cleaning may improve performance if iron has fouled the resin, but it will not remove existing stains from sinks, toilets, or laundry. Persistent staining also suggests that the well water may contain more iron or manganese than the softener can handle without pretreatment. Water testing can help identify the appropriate solution.
Does a water softener need to be sanitized after cleaning?
Sanitizing is not automatically required after every brine tank cleaning. It may be appropriate after contamination, certain repairs, long periods out of service, or when the manufacturer directs it. Use the exact manufacturer or qualified professional procedure, since the wrong disinfectant or dose can damage equipment or leave the system improperly rinsed.