
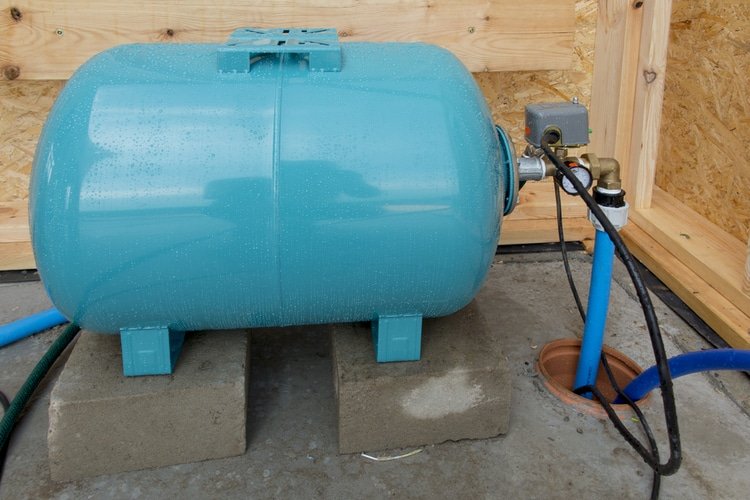
Knowing how to check a well pressure tank can help you spot pressure-system problems before they lead to frequent pump cycling, weak water flow, or a loss of water service. A pressure tank does not create water pressure on its own; it stores a small amount of pressurized water and reduces how often the well pump must start.
Most homes with a conventional private-well system use a bladder or diaphragm pressure tank connected to a pressure switch. A basic inspection usually involves watching the pressure gauge, listening to the pump cycle, checking for leaks, and—when appropriate—checking the tank’s air precharge with the system safely depressurized.
Do not remove electrical covers, adjust live wiring, bypass a pressure switch, or work on a damaged pressure vessel. If the tank is badly corroded, leaking, swollen, or if the pump repeatedly trips a breaker, contact a qualified well or pump professional.
Understand What the Pressure Tank Does
A conventional well pressure system has several parts that work together:
- Well pump: Moves water from the well to the home.
- Pressure tank: Stores water under pressure and provides a reserve called drawdown.
- Pressure switch: Tells the pump when to start and stop based on pressure.
- Pressure gauge: Shows the system’s current water pressure.
- Check valve and plumbing: Help keep water moving in the correct direction and maintain pressure.
In a typical system, the pump starts at the pressure switch’s cut-in pressure and stops at its cut-out pressure. For example, a system may be set to start at 30 psi and stop at 50 psi, or start at 40 psi and stop at 60 psi. The exact settings depend on the equipment and plumbing system.
The tank contains an air chamber separated from the water by a rubber bladder or diaphragm. As water enters the tank, the air compresses. When someone opens a faucet, that compressed air pushes water into the plumbing before the pump needs to start again.
If the tank loses its air charge or its internal bladder fails, the pump may start and stop much more often than normal. This is commonly called short cycling.
Signs Your Well Pressure Tank May Need Checking
You do not need to wait for a complete loss of water to inspect the pressure tank. Changes in water pressure or pump behavior can provide useful clues.
- The pump turns on and off every time a small amount of water is used.
- Water pressure rises and falls noticeably during a shower or while a faucet is running.
- The pressure gauge jumps quickly from cut-in to cut-out.
- The pump runs for only a short time, stops, and starts again soon afterward.
- You hear clicking from the pressure switch more often than usual.
- The tank exterior is wet, rusty, dented, or leaking.
- Water pressure drops throughout the house, not just at one fixture.
- The pressure gauge does not change even when water is running.
These symptoms do not prove that the pressure tank is the problem. A clogged filter, plumbing restriction, leaking toilet, failing pressure switch, well-yield issue, pump problem, or inaccurate gauge can produce similar symptoms. Checking the system in a logical order helps avoid replacing the wrong part.
Tools and Information to Gather First
A few simple items make the inspection easier. Use only tools that are in good condition and appropriate for the task.
- A flashlight
- A notebook or phone for recording gauge readings and pump behavior
- A tire-style air-pressure gauge known to be accurate
- Manufacturer documentation for the tank, pressure switch, or constant-pressure controller, if available
- A dry cloth for checking for moisture around fittings
Before testing, identify whether you have a conventional pressure-switch system or a variable-speed/constant-pressure system. A conventional system generally has a pressure tank and a mechanical pressure switch that cycles between two pressure settings. A constant-pressure system may use an electronic controller and a smaller tank, and its testing requirements can be different.
If you are unsure which system you have, avoid changing air pressure or switch settings until you identify the equipment model and review its instructions.
Step 1: Inspect the Tank Exterior and Nearby Plumbing
Start with a visual inspection while the system is operating normally. You do not need to touch electrical parts or take anything apart.
Look for corrosion, damage, and leaks
Check the tank shell, base, fittings, and nearby pipes. Surface rust in a damp basement or well house may be cosmetic, but deep corrosion, flaking metal, bulging, or water seepage deserves professional attention. A pressure tank is a pressurized vessel and should not be patched, drilled, welded, or pressurized if it appears structurally damaged.
Use a dry cloth around visible threaded connections and valves. Moisture on the cloth can help identify a small plumbing leak. Also look at the floor beneath the tank for staining or recurring puddles.
Check the air valve cap
Most bladder tanks have an air valve near the top, similar to a tire valve. Make sure its cap is present and hand-tight. The cap helps keep dirt and moisture out of the valve.
Do not press the valve core during this initial inspection. If water comes out of the air valve, it can indicate a ruptured bladder or diaphragm, but the tank should be evaluated by a qualified professional rather than repeatedly tested or re-pressurized.
Notice the pressure gauge condition
The pressure gauge is one of the most useful diagnostic tools, but gauges can fail. A gauge that stays at one reading all the time, shows obvious damage, fogs internally, or does not respond when water is used may not be reliable.
A bad gauge can make a healthy tank appear defective. If the gauge reading does not match system behavior, replacement by a qualified technician may be the next practical step.
Step 2: Watch the Pressure Gauge Through a Pump Cycle
Watching one complete pump cycle is a safe way to learn how your system behaves. This check can reveal short cycling, a stuck gauge, unusually slow pressure recovery, or an unexpected pressure range.

Credit: teamaustin.com
How to observe a normal cycle
- Choose a time when no major water appliances are running, such as a dishwasher, washing machine, irrigation system, or water treatment regeneration cycle.
- Look at the pressure gauge and write down the current pressure.
- Open a cold-water faucet or hose bib slowly. A bathtub faucet is often easier to observe than a low-flow fixture.
- Watch the gauge as pressure falls and listen for the pump to start.
- Record the pressure at which the pump starts. This is the approximate cut-in pressure.
- Close the faucet after the pump starts, then watch the gauge rise.
- Record the pressure at which the pump stops. This is the approximate cut-out pressure.
The pressure should generally fall gradually while water is being used and rise steadily after the pump starts. The pump should not rapidly start and stop while a modest amount of water is flowing.
What different gauge patterns can mean
| What you observe | Possible explanation | Useful next step |
|---|---|---|
| Pressure drops normally, then pump starts and restores pressure steadily | The tank and pump may be operating normally | Continue monitoring if there are no pressure complaints |
| Pressure rises from cut-in to cut-out almost immediately | Low tank drawdown, lost air charge, failed bladder, or an inaccurate gauge | Check the tank air precharge only using the safe procedure below |
| Pump starts and stops repeatedly while water is running | Short cycling, pressure-control issue, or limited drawdown | Arrange professional diagnosis if the condition continues |
| Pressure rises very slowly or never reaches cut-out | High water demand, clogged treatment equipment, plumbing restriction, pump issue, leak, or well-supply limitation | Check filters and visible leaks; contact a well professional if the issue affects the whole home |
| Gauge does not move when water is used | Faulty or blocked gauge connection, or an inaccurate gauge | Have the gauge and pressure controls evaluated |
Do not diagnose a pump failure from a single cycle. Household demand, treatment equipment, fixture flow, well recovery, and gauge accuracy all affect what you see.
Step 3: Check for Short Cycling and Reduced Drawdown
Drawdown is the usable amount of water a pressure tank delivers between pump shutoff and pump startup. It is not the same as the tank’s total physical volume. A large tank may hold many gallons internally but provide only part of that amount as usable water between pressure-switch settings.
When a tank has adequate drawdown, you can usually run water for a period after the pump stops before the pressure falls enough for the pump to restart. When drawdown is very low, the pump may start after only a small amount of water use.
A simple drawdown observation
After the pump reaches cut-out and stops, open a faucet at a steady flow. Watch the pressure gauge and note whether the pump starts unusually quickly. You do not need to calculate the exact gallons unless you are diagnosing system performance with a professional.
Reduced drawdown can occur when:
- The tank air charge is too low.
- The bladder or diaphragm has failed.
- The tank is undersized for the household’s water demand.
- The pressure-switch settings were changed without matching the tank precharge.
- A constant-pressure system is being evaluated as though it were a conventional tank system.
Short cycling is more than an inconvenience. Frequent starts increase wear on the pump motor, pressure switch, control components, and pump-start equipment. Address persistent short cycling rather than allowing it to continue.
Step 4: Check the Tank Air Precharge Safely
The air precharge is the air pressure inside an empty bladder-style pressure tank. It must be checked only when there is no water pressure on the tank side of the system. Measuring air pressure while the tank is still pressurized with water will not give a meaningful result.
This procedure is appropriate only for a conventional bladder or diaphragm tank when the manufacturer permits it. It may not apply to galvanized air-over-water tanks, captive-air tanks with unusual configurations, or variable-speed constant-pressure systems.
Important safety boundary
Before checking air precharge, turn off power to the pump at the appropriate disconnect or breaker and make sure it cannot restart. Do not remove pressure-switch covers or handle any wiring. Follow the tank manufacturer’s instructions for isolating and draining the tank. If there is no accessible isolation valve, drain connection, or clear manufacturer guidance, call a qualified well professional.
How to measure precharge on a conventional tank
- Record the system’s observed cut-in pressure from the gauge cycle test.
- Turn off power to the well pump using the proper disconnect or breaker.
- Open a faucet and allow water pressure to drop fully to zero on the pressure gauge.
- Confirm that the tank is drained or fully relieved according to the manufacturer’s instructions. Water-side pressure must be fully relieved before testing air pressure.
- Remove the cap from the tank’s air valve.
- Briefly use an accurate tire-style pressure gauge to measure the air pressure.
- Replace the air-valve cap after checking the reading.
For many conventional pressure-switch systems, the tank precharge is commonly set slightly below the pump cut-in pressure. A frequently used guideline is 2 psi below cut-in, but this is not a universal rule. Confirm the correct setting on the tank label, pressure-control documentation, or manufacturer instructions before adding or releasing air.
For example, if a manufacturer specifies a precharge 2 psi below a 40 psi cut-in setting, the target would be 38 psi. That example does not apply automatically to every tank or pressure-control system.
What the precharge reading may tell you
- Precharge is close to the manufacturer-specified value: The air charge may not be the source of the problem. Continue evaluating drawdown, gauge accuracy, pressure controls, and plumbing restrictions.
- Precharge is lower than specified: The tank may need air added, but only after confirming the correct specification and ensuring the tank is fully depressurized on the water side.
- Precharge is higher than cut-in or the specified setting: The tank may deliver very little usable water before the pump starts.
- Water comes from the air valve: This often indicates an internal bladder or diaphragm failure. Stop the check and arrange tank service or replacement evaluation.
- The tank will not hold an air charge: There may be a leaking valve core, damaged bladder, or tank failure. Professional assessment is appropriate.
Step 5: Check Related Causes of Pressure Problems
A pressure tank is only one part of the water system. Before concluding that the tank needs replacement, look for simple issues that can affect pressure or pump cycling.

Credit: pvcfittingsonline.com
Check filters and treatment equipment
A clogged sediment filter, exhausted cartridge, fouled iron-treatment system, or restricted water softener can reduce water flow throughout the house. This usually feels like weak flow rather than a tank problem, although severe restrictions can affect pressure recovery.
Follow the manufacturer’s maintenance instructions for filters and treatment equipment. Do not bypass treatment equipment if it is installed to address a known water-quality concern without understanding why it is there.
Look for continuous water use
A toilet that continuously refills, a leaking outdoor hydrant, a broken irrigation line, or a plumbing leak can cause repeated pump operation. Turn off water use in the home and observe whether the pressure falls while the pump is off.
If pressure drops with no intentional water use, there may be a leak or a check-valve issue. Because leaks can occur underground or inside the well system, a professional may need to isolate the cause.
Separate one-fixture problems from whole-house problems
If low pressure occurs at only one faucet or shower, the issue may be a clogged aerator, showerhead, local shutoff valve, or fixture cartridge. A pressure tank issue generally affects multiple fixtures and the overall system pressure.
If every fixture has weak flow, the problem may involve the pressure system, a whole-house filter, water treatment equipment, plumbing restrictions, or the well pump. Recording what affects the problem will help a contractor diagnose it efficiently.
When a Pressure Tank May Need Professional Service or Replacement
A qualified well contractor can test tank drawdown, pressure-switch operation, pump performance, electrical controls, and well recovery. Professional service is especially important when symptoms point to more than a simple air-charge issue.
Contact a professional when you notice:
- Water leaking from the tank shell, seams, or air valve
- Severe corrosion, bulging, or physical damage
- Repeated short cycling after the precharge has been checked correctly
- A pump that will not reach cut-out pressure
- A breaker that trips or an electrical burning smell
- Loss of water throughout the home
- Pressure that falls when all fixtures are off
- Uncertainty about whether the system is conventional or constant-pressure
When calling for service, provide the tank brand and model if visible, the observed cut-in and cut-out readings, whether the problem affects the whole house, any recent filter changes or plumbing work, and whether the pump is short cycling. Those details can reduce guesswork.

Credit: iestpmache.edu.pe
Keep a Simple Pressure-System Maintenance Record
Pressure tanks often operate quietly for years, so small changes can be easy to miss. Keeping a short maintenance record helps establish what is normal for your system.
- Date of inspection
- Observed cut-in and cut-out pressure
- Whether the pump cycled normally
- Any visible leaks or corrosion
- Filter replacements and water-treatment maintenance
- Changes in household water pressure or flow
- Any professional service performed
A periodic visual inspection and occasional observation of a full pump cycle are usually more useful than repeatedly adjusting settings. The goal is to identify meaningful changes early, not to alter a system that is operating properly.
Frequently Asked Questions
How often should a well pressure tank be inspected?
A visual check several times a year is reasonable, especially in damp basements, pump houses, or areas prone to freezing. Check sooner if you notice short cycling, changing water pressure, unusual pump noise, or visible moisture around the tank and plumbing.
Can I check a pressure tank while the pump is running?
You can safely observe the pressure gauge and listen to pump operation while the system is running. However, do not measure or adjust the tank’s air precharge while the tank contains water pressure. Turn off pump power and fully relieve water-side pressure first.
Why does my pressure tank feel heavy?
A pressure tank normally contains water and will feel heavy. Weight alone cannot confirm whether the tank is waterlogged or whether its bladder has failed. Pump cycling behavior, drawdown, air-precharge testing, and professional evaluation provide more useful information.
Will adding air always fix a short-cycling well pump?
No. Adding air may help only when a conventional bladder tank has a low precharge and the bladder is intact. A failed bladder, bad pressure gauge, faulty pressure switch, plumbing leak, pump-control problem, or system restriction can also cause frequent cycling.
What is the most useful information to give a well contractor?
Share the pressure tank model, pressure-gauge readings at pump start and stop, whether pressure problems affect the whole house, how often the pump cycles, recent changes to filters or treatment equipment, and any leaks, corrosion, or electrical symptoms you observed.